CMDB Concepts
DataGerry is a flexible asset management solution (also known as a CMDB) that allows users to build their own data models by defining custom types. The core unit of data in DataGerry is the Object.
An Object represents a real-world asset or entity—such as a router, server, building, or service contract. Each Object is based on a Type, which defines a set of fields representing the attributes of that Object. Examples of such fields are:
Hostname (text)
Maintenance Status (checkbox)
Location (dropdown)
Warranty Expiration (date)
Each field is assigned a specific data type, offering a high level of flexibility for modeling any kind of structured information. This enables teams to manage technical infrastructure, business assets, or virtually any domain-specific data within a single platform—tailored entirely to their own requirements.
The basic concepts of Data Structure Modeling will be explained in more detail in the upcoming sections.
Categories
Categories in DataGerry are used to organize Types by grouping them together and enhancing the organisational overview in the sidebar. They can be structured hierarchically by assigning an existing Category as a parent. To manage Categories, navigate to Framework => Categories.
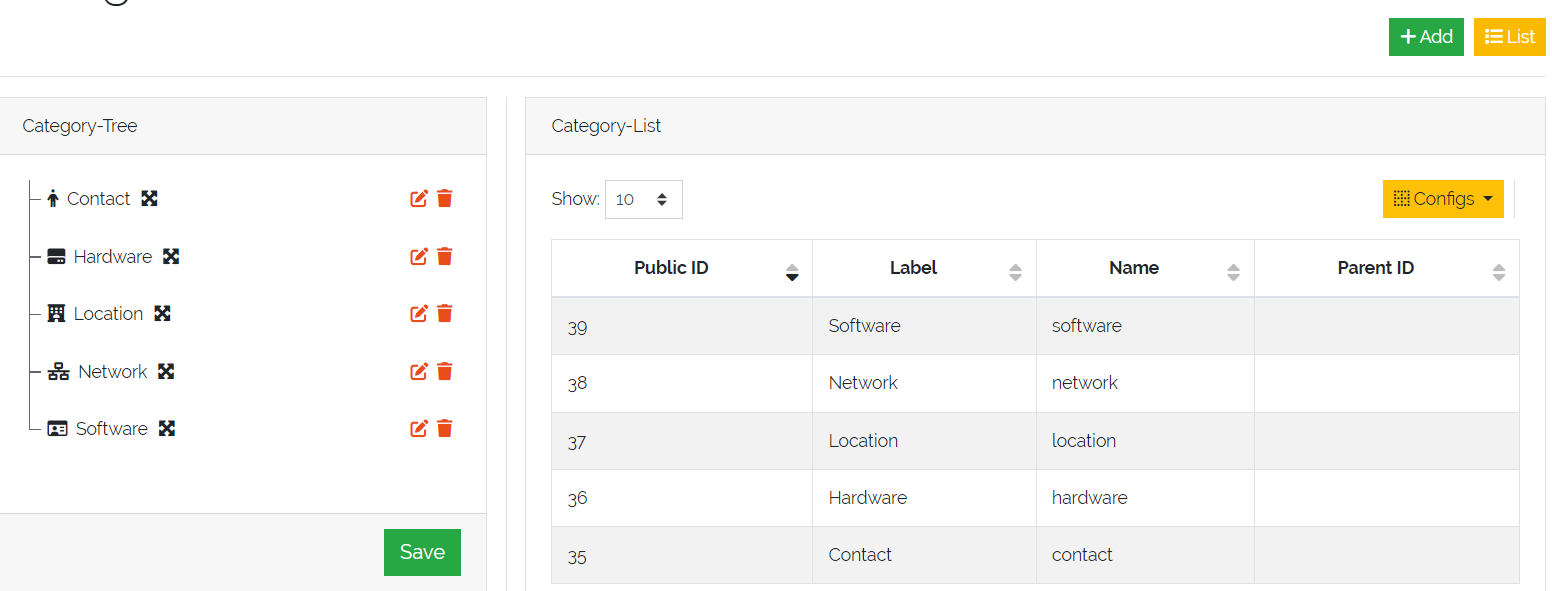
Categories overview
In the Categories overview, you will find the “Category-Tree”, which visualizes the current structure of all Categories. The “Category-List” provides a detailed view of each existing Category, including information such as PublicID and ParentID. At the top right corner, there are two buttons: the “Add” - Button for creating a new Category, and the “Edit” - Button for rearranging or deleting existing Categories in the “Category-Tree”.

Picture: Overview of Categories
In DataGerry, the tree structure of Categories and their assigned Types is visible in the sidebar under the “CATEGORIES” tab on the left side. Any Type that is not assigned to a Category appears in the “UNCATEGORIZED” section below.
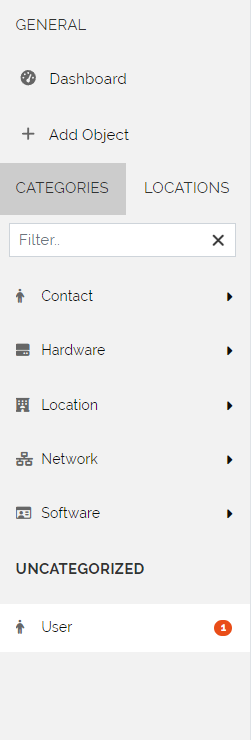
Picture: Displayed Categories in the Sidebar of DataGerry
Create a Category
To create a new Category click the “+Add”-Button in the “Categories Overview”. All unassigned Types are displayed in the left “Unassigned types” overview and can be Drag/Dropped into the “Types” area within the “Basic information” section. In the “Basic information”-Section it is poosible to set the following properties:
Field |
Description |
|---|---|
Name |
A unique identifier for the Category |
Label |
The displayed label of the Category |
Icon |
The icon of the Category is displayed in various views , such as the sidebar |
Parent |
Select the top Category if this one should be a sub Category |
Types |
Drag/Drop Types in this section which should be grouped by this Category |
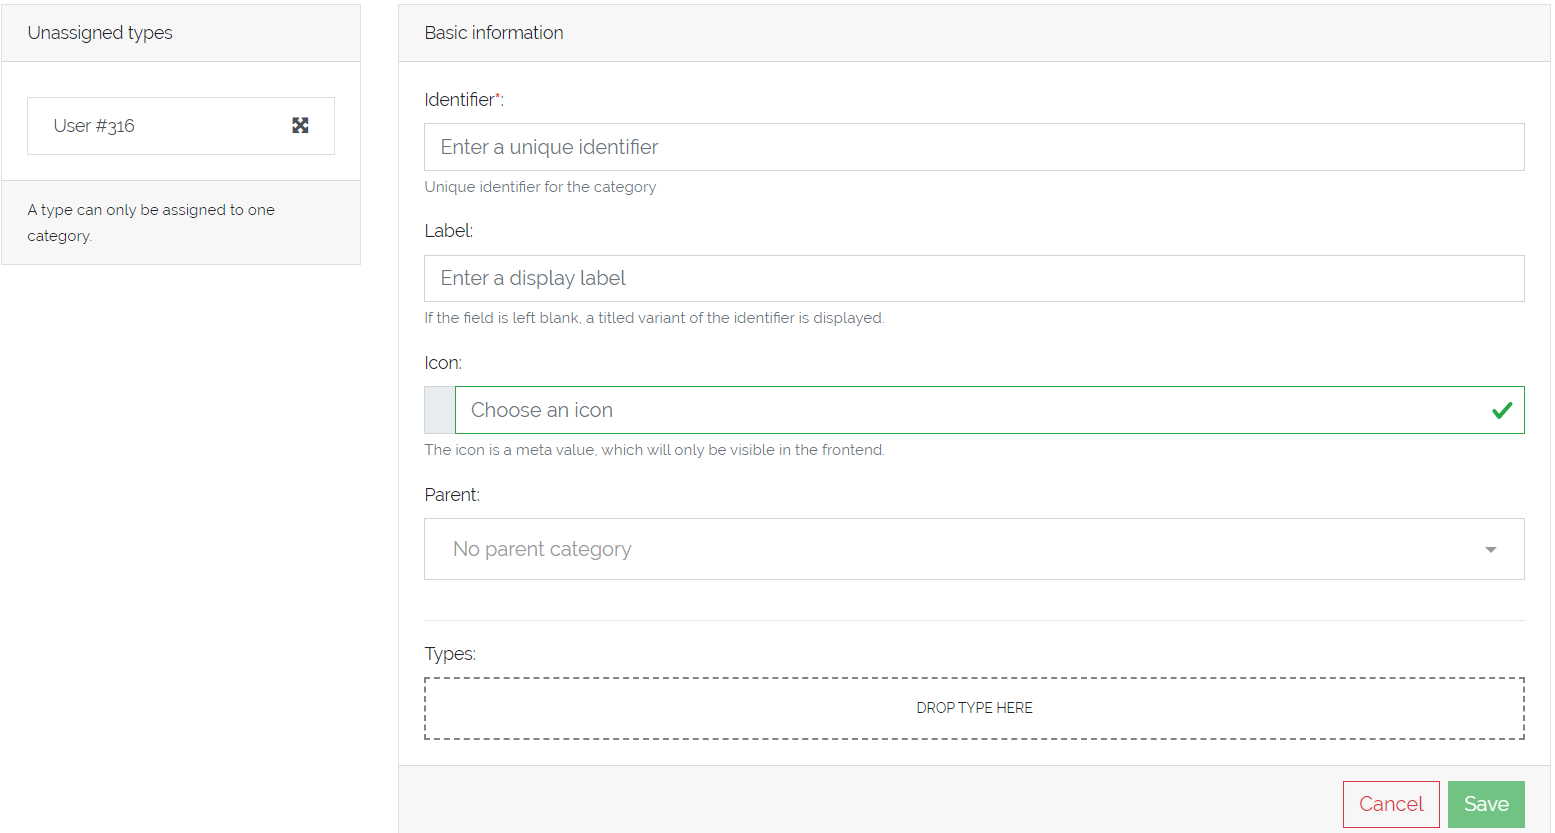
Picture: Adding a Category
Edit/Delete a Category
To edit a Category press the “Edit”-Button located in the top right corner of the “Categories View”. This action will toggle the display of the “Category-Tree” section. Within this view, you can rearrange the order of Categories by dragging and dropping the icon to the right of the Category - Label. Each Category is accompanied by two actions: accessing its ‘Edit’ form or deleting it (by clicking the Trash Bin - Icon).
Note
Deleting a Category will not delete the assigned Types.
Picture: Edit a Category in “Category-Tree”
When editing a Category within the “Edit”-Form you can additionaly rearange the order of the assigned Types as well as modify the assignments.
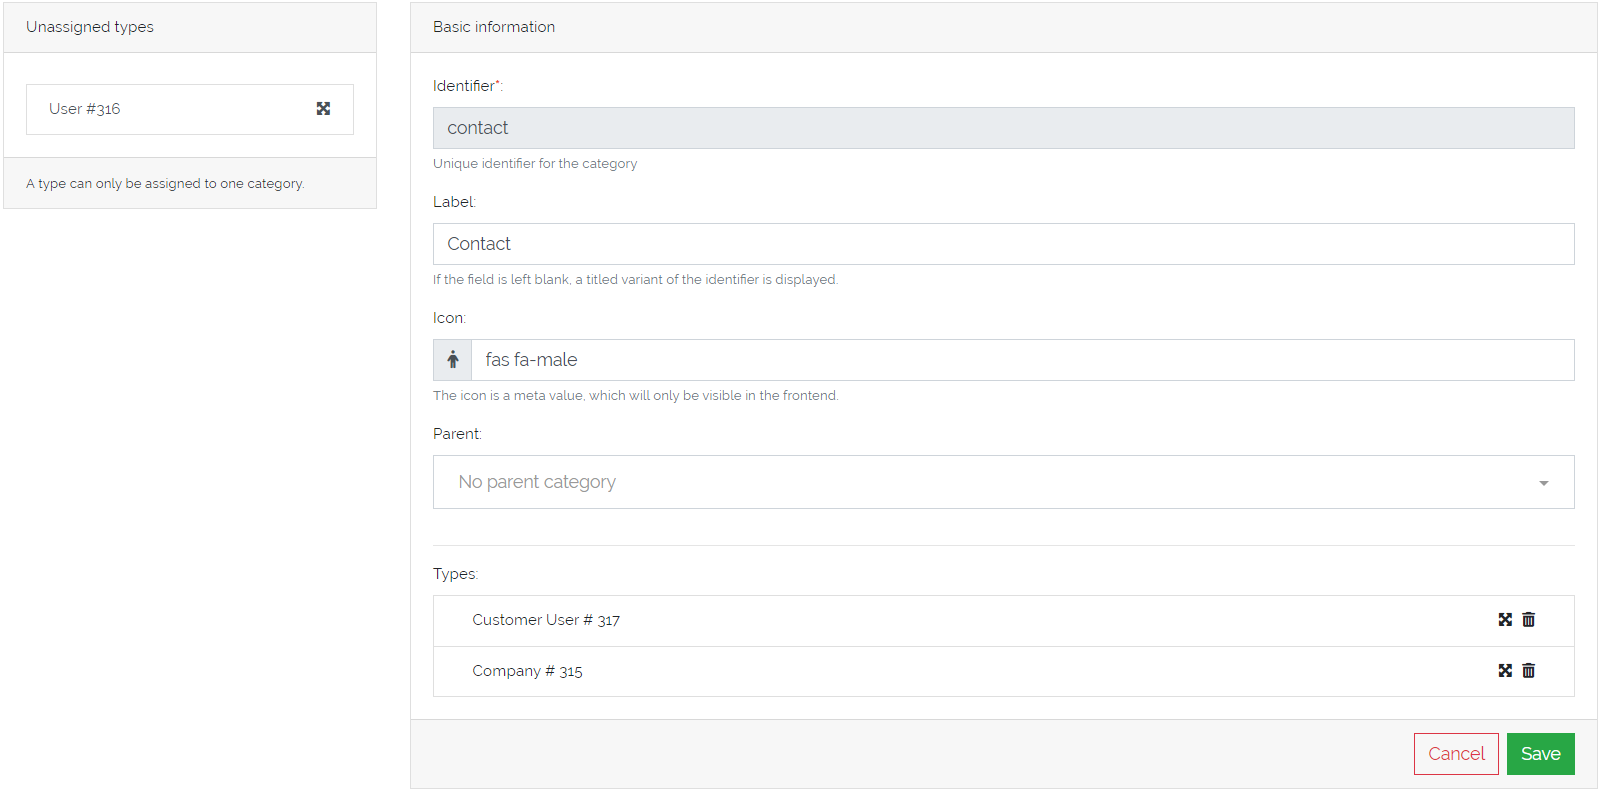
Picture: Edit a Category in “Edit”-Form
Types
Types are structured entities that enclose various sections, each containing specific fields. These fields are designed to capture and describe the attributes and characteristics of real-world objects. By organizing information into sections, Types provide a systematic way to represent complex Objects and their properties, ensuring consistency and clarity in data management.
Types serve as blueprints for Objects, defining the structure and characteristics each Object can possess. In other words, a Type specifies the fields and potential values that an Object can include, ensuring that all Objects of a particular Type adhere to a consistent format and set of attributes.
To manage Types go to in the top right corner.
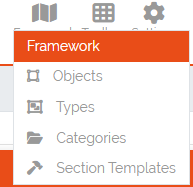
Picture: Open Types management
Adding a Type
The type list () provides an overview of all the Types created so far, displayed in a table format. Above the table, there is an “Add” button, which opens a form for creating a new Type. The form consists of several steps.
Step 1 - Basic information
In this step you need to provide some basic information about the Type:
Name: A unique identifier for the Type
Label: The displayed label of the Type
Icon: Select an icon for the Type by double clicking in the name (“fa fa-cube”) of the default icon
Once you have completed these fields, press the “Next Step” button to proceed to the next step.
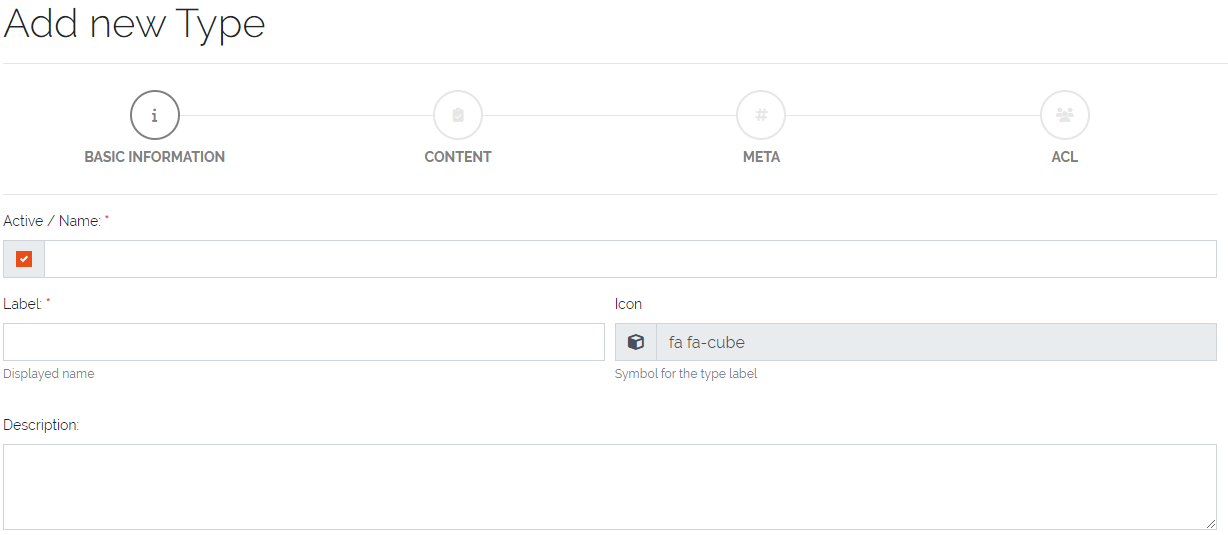
Picture: Type creation - Step 1
Step 2 - Content
In this step all sections and their correspondig fields are defined for the Type. In the left sidebar are several expandable elements which provide components to build up a Type by drag and dropping these components inside the area in the center.
Note
Fields must always be placed within a section. As a result, the smallest valid Type consists of one section and one field.
Global Section Templates: For more infomation about this section see this link: Section Templates
Section Templates: For more infomation about this section see this link: Section Templates
Structure Controls: These components group fields. Fields can only be placed inside of these Structure Controls. More details can be found in the table below.
Basic Controls: These components are the fields with different data formats. They need to be dragged and dropped inside of Structure Controls. More details are in the table below.
Special Controls: These components are also fields but with a specific purpose. More details are in the table below.
Note
After you finished Step 1 and 2, the Type can be saved. Steps 3 and 4 are optional to configure.

Picture: Definition of fields for Type - Step 2
Types of Structure Controls
Type |
Description |
|---|---|
Section |
A container used to group fields |
Multi Data Section |
Allows saving multiple values for the defined fields. See more: Multi Data Sections |
Reference Section |
Binds a section with all fields of a referencing object completely as a display. The search for the field values is run through like a normal field. The references are expanded accordingly, so that a distinction is made between field references and section references. |

Picture: Definition of the object fields via reference section
Basic and Special Controls
Type |
Description |
|---|---|
Text |
A text field. Content validation with regular expression is possible |
Number |
A numeric field. Only accepts numbers a input |
Password |
password field with integrated password generator and hiding of content |
Textarea |
Textbox with multiple lines |
Checkbox |
A checkbox used to store a True or False value |
Radio |
Selection between multiple options |
Select |
Selection between multiple options with a dropdown menu |
Date |
A Date picker |
Reference |
Reference to another Object of a specific Type. E.g. connection between a PC and a hard drive. Embeds a summary of a referencing Object as a display. The summary for each object definition is predefined in the type configuration under the “Meta” step. With the field type “Reference” it is possible to override the predefined summaries and make them user specific. |
Location |
Can be only used once per Type. Follow this link for more information: Locations |

Picture: Special Control - Reference
Step 3 - Meta(Optional)
In this step the meta information of the Type can be set. Each object can have summary fields. These fields summarize the Object and are shown by default in object lists. On a router, this could be a management ip and a hostname. The summary fields can be set under “Summary”. Also, external links can be set, which are shown on the object page to add a quick link to the WebUI of another system. An External Link has a name, a label, an icon and the link (URL) itself. In the link, use curved brackets to access values of an Object field.
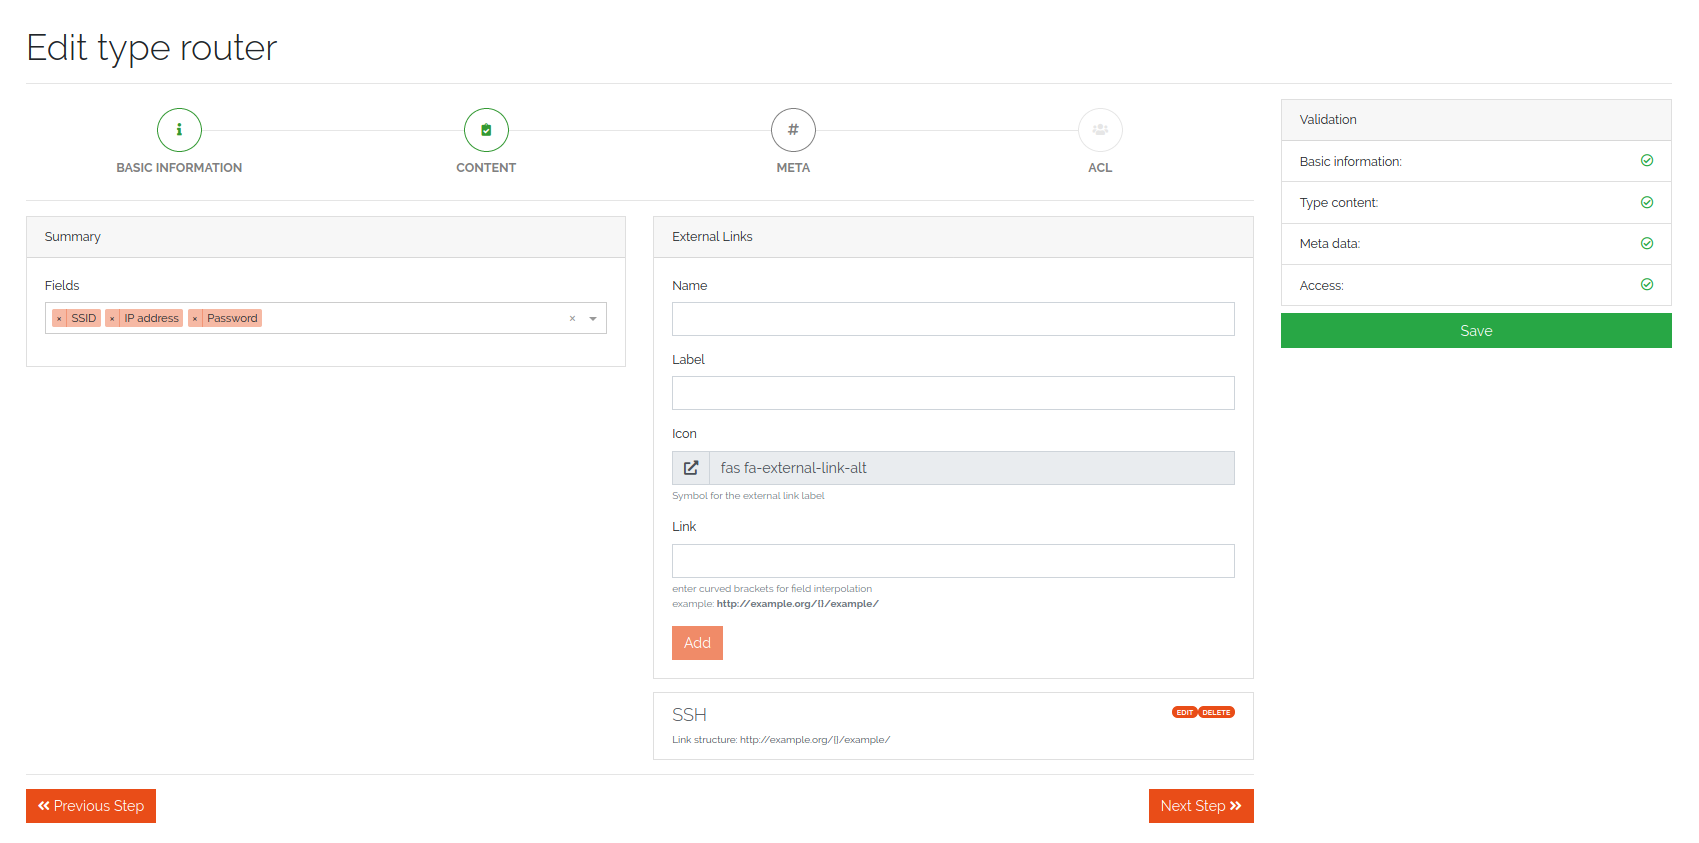
Picure: Meta information of a Type
Step 4 - ACL (Optional)
In this step advanced permissions can be set for this Type. The default setting is set to “ACL deactivated”. More information to this topic at this link: Type ACL

Picure: ACL settings for the Type
Editing/Deleting a Type
The Type table () itself contains, apart from several useful information about the created Types, two columns in the end with “Actions” and “Clean”. In the “Actions” column it is possible to edit, clone or delete the existing Types.
Warning
A Type can only be deleted if there are no exisitng Objects of this Type
In the “Clean” column is a button which will turn red and state “Unclean” if you change the Type schema (by adding or deleting fields/sections) This happens only if there is at least one Object of this Type. By pressing the “Unclean”-Button it lets you update all your created Objects of this Type with the changes you applied on the Type (for example a newly added field to the Type will be added to all existing Objects of that Type).
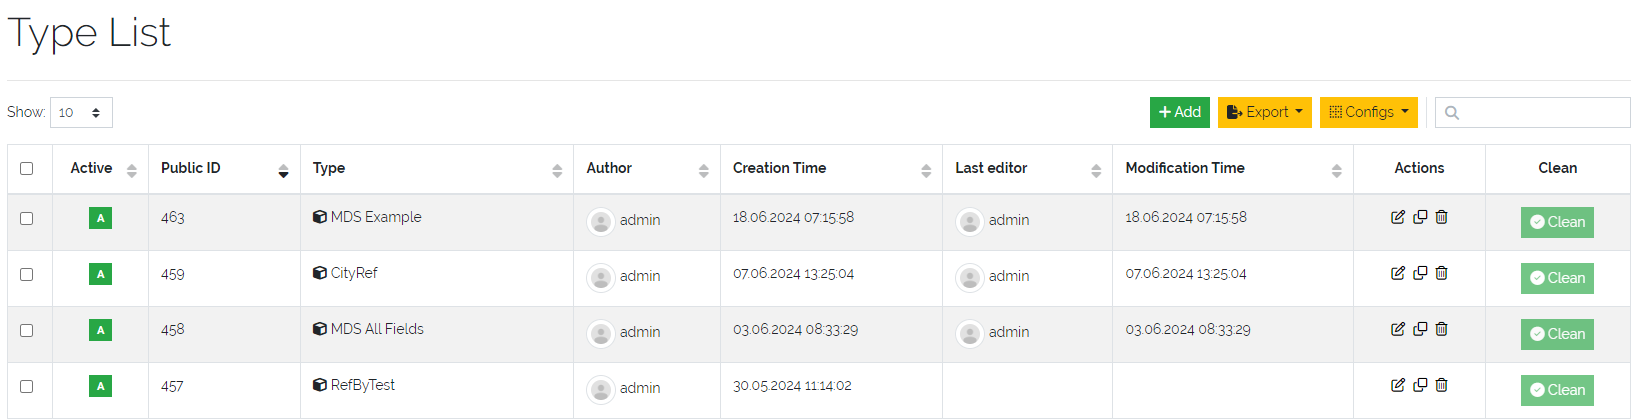
Picure: Types overview table
Objects
You can access Objects in DataGerry in several ways:
using the Category tree on the left side
using the search bar at the top
When using the Categories tree, you can choose a Type (e.g. Router) and get a list with all Objects of that Type. By default, only summary fields of an Object are shown in the table, with the yellow “Columns” button, additional fields can be faded in.
Active und Inactive Objects
Objects in DataGerry can be active or inactive. Inactive Objects are hidden in the WebUI. By default, all new created Objects in DataGerry are active. You can set an Object to inactive by hitting the small switch on the Object view page.
If you want to see inactive Objects in the WebUI, click on the switch under the navigation bar.

Figure 8: Active / Inactive Objects switch
Object tables search / filter
Searching a table is one of the most common user interactions with a DataGerry table, and DataGerry provides a number of methods for you to control this interaction. There are tools for the table search(search) and for each individual column (filter). Each search (table or column) can be marked as a regular expression (allowing you to create very complex interactions).
Note
This method only applies the search to the table - it does not actually perform the search in the database
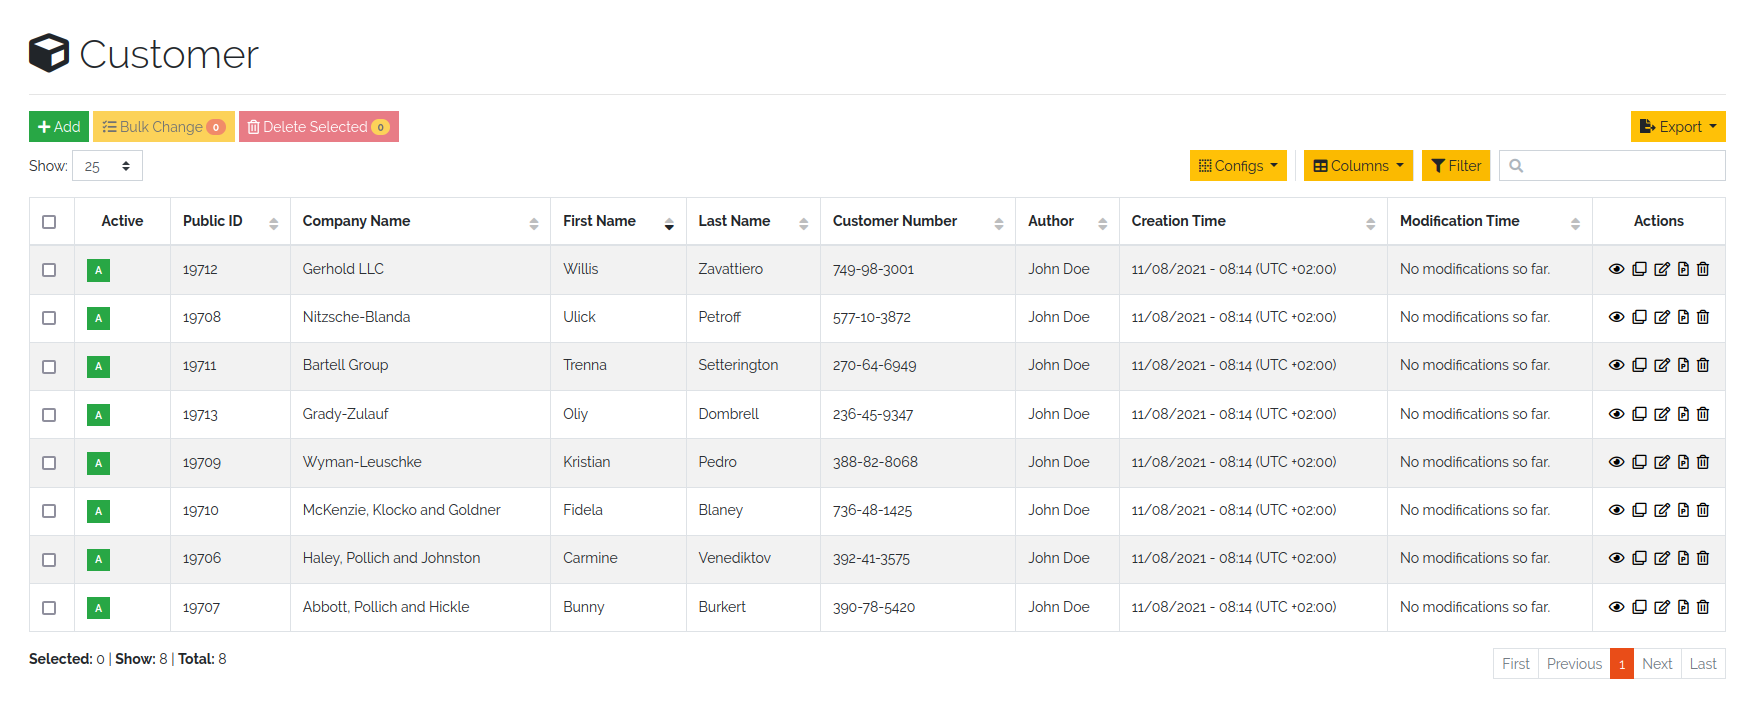
Figure 9: Unfiltered object overview
Table search
The search option offers the possibility to check the results in a table. The search is performed across all searchable columns. If matching data is found in a column, the entire row is matched and displayed in the result set. See Figure 10: Search result after searching for “B”

Figure 10: Search result after searching for “B”
Table filter
While the search function offers the possibility to search the table, the filter method provides the ability to search for data in a specific column.
The column searches are cumulative, so additional columns can be inserted to apply multiple individual column searches, presenting the user with complex search options.
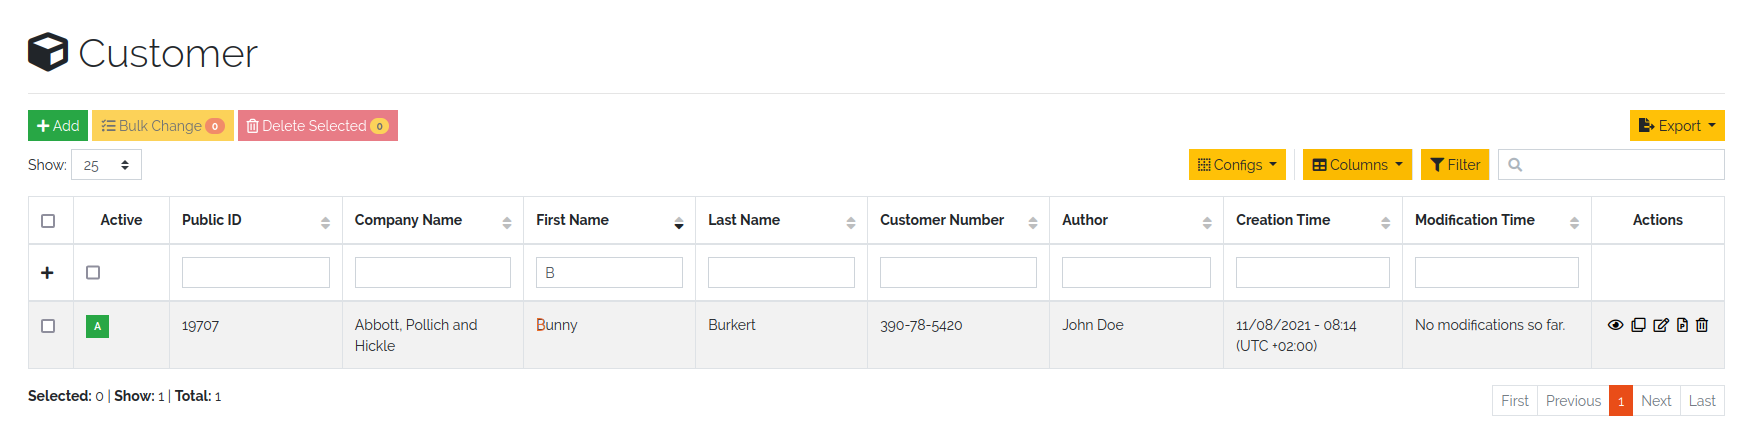
Figure 11: Filter result after filtering for “B”
The search terms within different rows are linked with each other with the condition OR (Figure 12: Filtering by OR-expression). The search terms within a row are all linked with the condition AND (Figure 13: Filter by AND-expression). Only the filtered Objects are available for exporting the values from the current table.
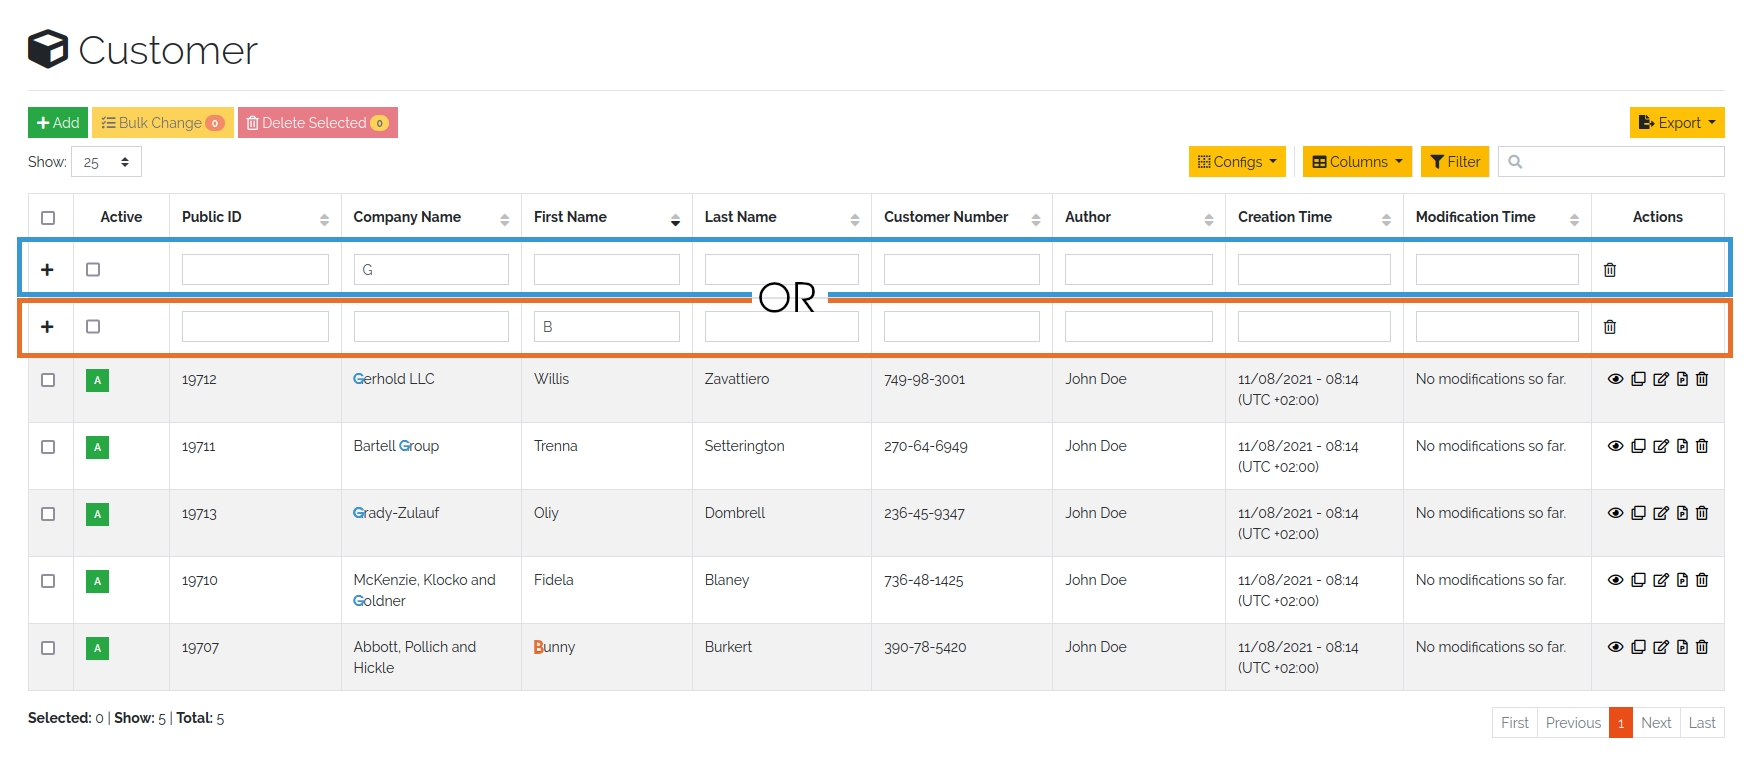
Figure 12: Filtering by OR expression
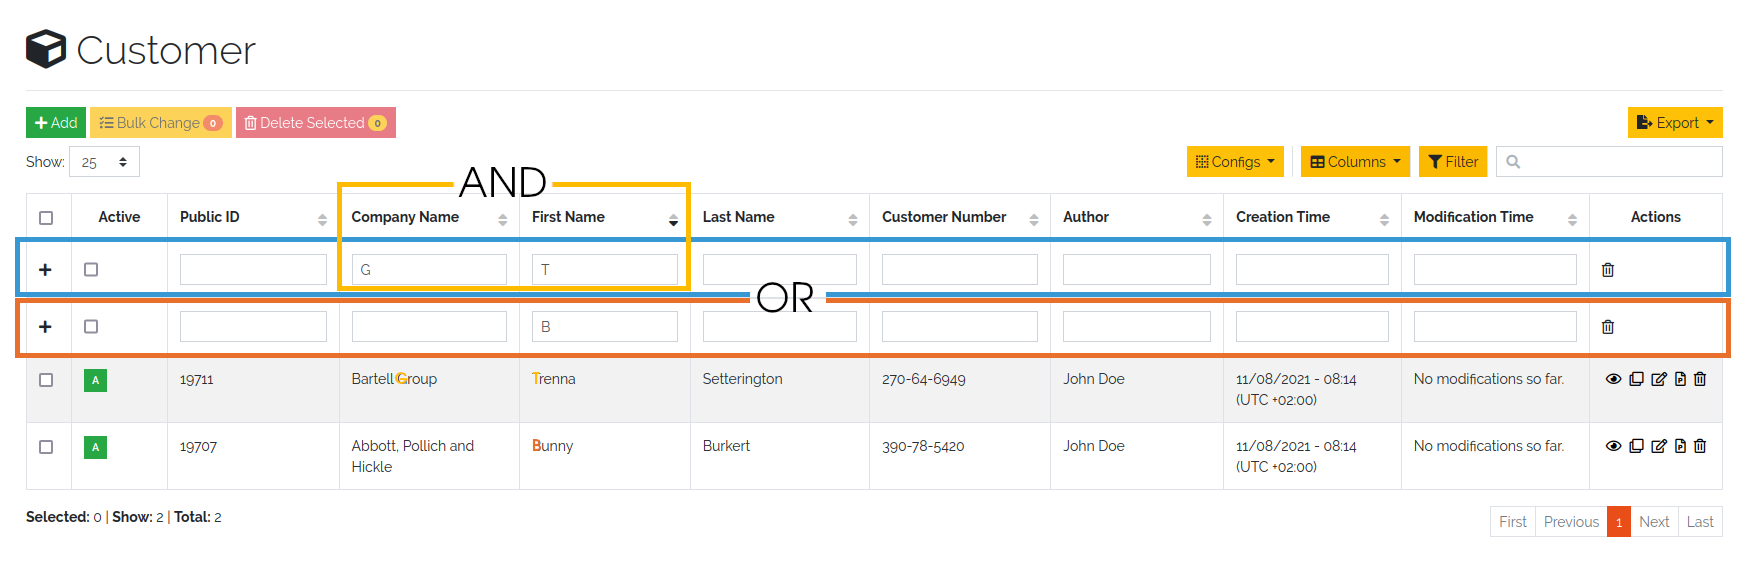
Figure 13: Filtering by AND expression
Note
Date values must be searched according to the following format:
Format: YYYY-MM-DDThh:mmZ
Example: 2019-12-19T11:02
Bulk change of Objects
The bulk change is a function in DataGerry with which several Objects can be changed in one step on the basis of change templates. With this change, the selected Objects adopt the field values of the change template.
Start
Simply select all Objects you want to change and click on the yellow button for mass changes above the list.
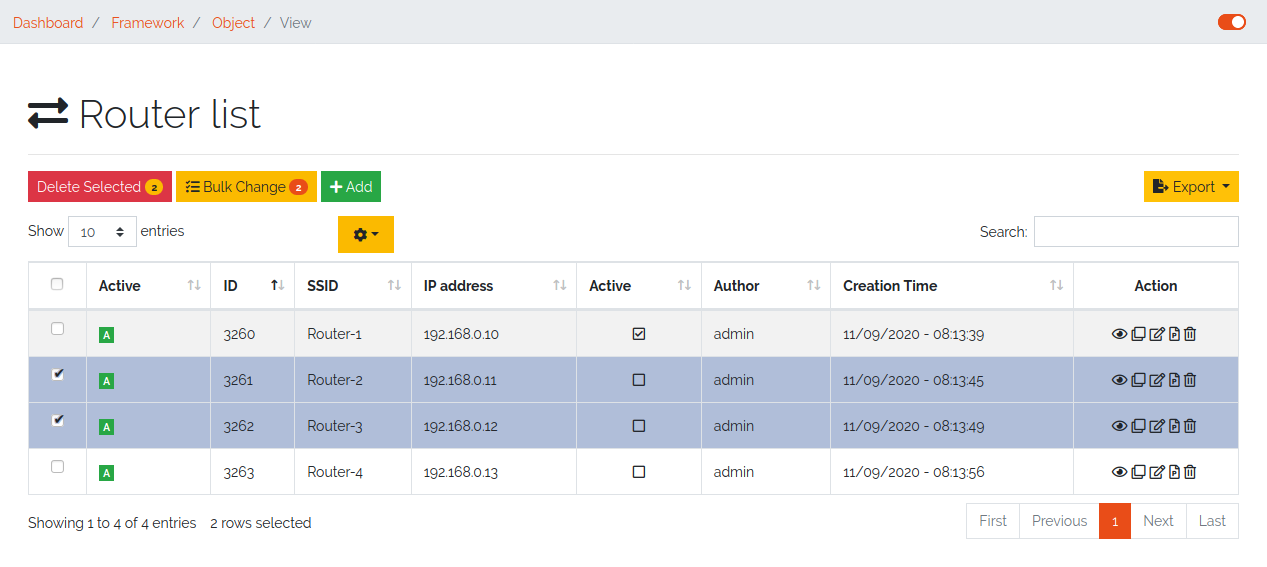
Figure 14: Select objects for bulk change
Template
A change template is generated based on the assigned Type. The following change template is identical to the creation of a regular Object. Store all contents that you want to transfer to the Objects later and save your entries.

Figure 15: Change template
Preview:
In the preview, all changes made are listed and can be adjusted again if necessary.
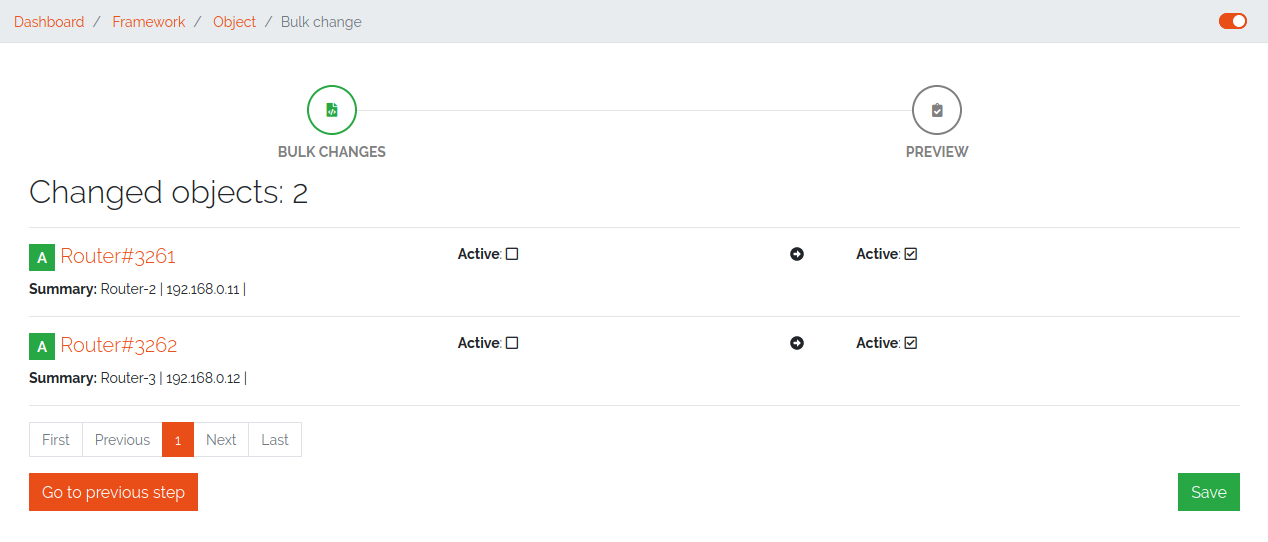
Figure 16: Overview of changes
Result:
After a preview, the selected objects will be changed.
Figure 17: Bulk change result
ObjectGroups
Note
As of Version 3.0.0, ObjectGroups are currently only utilized by the ISMS functionality. Integration with other areas of DataGerry is planned for future releases.
ObjectGroups provide a powerful way to logically group related configuration items (CIs) in the CMDB, making management, documentation, and analysis significantly more efficient.
Benefits
Simplified Management: ObjectGroups enable administrators to work with collections of Objects as a single entity, improving clarity and reducing complexity when handling infrastructure components.
Improved Visibility: By grouping related Objects (e.g., servers, load balancers, databases) under a common service or application context, dependencies and relationships become more transparent.
Flexible Grouping: - Static Groups: Multiple specific Objects are explicitly assigned to the ObjectGroup, giving full manual control. - Dynamic Groups: Entire Types are assigned, and all Objects of those Types automatically belong to the ObjectGroup. This is ideal for environments with frequent changes.
Categorization Support: Multiple category tags can be assigned to an ObjectGroup, helping to organize and filter ObjectGroups by business area, service level, environment (e.g., production or staging), and more.
Better Impact Analysis: Understanding the full scope of a service or application is easier when all relevant Objects are grouped together, especially during incidents or planned maintenance.
To access ObjectGroups, navigate to Framework -> ObjectGroups. This section provides a tabular overview of all existing ObjectGroups. Above the table, you’ll find an “Add” button, which opens a form for creating a new ObjectGroup. In the Actions column, you can edit or delete existing ObjectGroups.

Picure: ObjectGroups overview table
Adding an ObjectGroup
To add a new ObjectGroup, go to Framework -> ObjectGroups and click the “Add” button to open the creation form. There are two types of ObjectGroups:
Static groups, which contain multiple Objects
Dynamic groups, which include multiple Types and automatically group all existing Objects of those Types
Group Name |
The display name of the ObjectGroup |
|---|---|
Group Type |
The group mode: - Static: Manually assigned Objects - Dynamic: All Objects from selected Types |
Categories |
Tags that can be assigned to organize or label the ObjectGroup |
Assigned Objects |
Depending on the group type, either selected Objects or Types |

Picure: ObjectGroups creation form
Adding Categories to ObjectGroups
Categories can be assigned to ObjectGroups to help organize and filter them effectively. To manage these categories, click the “Manage Categories” button. Categories created here are global and shared across all ObjectGroups.

Picure: ObjectGroups categories management
Persons
Note
As of Version 3.0.0, Persons are currently only utilized by the ISMS functionality. Integration with other areas of DataGerry is planned for future releases.
The Persons section in DataGerry provides a way to model real-world individuals relevant to your organization or processes. These are not users of the DataGerry frontend and do not represent login accounts, but rather describe people who are referenced in documentation, responsibilities, or compliance records — such as employees, external contacts, or role-holders.
To access Persons, navigate to Framework -> Persons. This area displays a tabular overview of all defined Persons, with options to Add, Edit, or Delete entries.

Picure: Persons overview table
Adding a Person
To add a new Person, go to Framework -> Persons and click the “Add Person” button to open the creation form.
First Name |
The given name of the Person |
|---|---|
Last Name |
The family name or surname of the Person |
Display Name |
(Read-only) – Automatically generated as “<FirstName> <LastName>”, used when referencing the Person in other parts of the system |
Phone Number |
Phone number of the Person |
Email address of the Person |
|
Groups |
Assigned PersonGroups that this Person belongs to |
Note
When a Person is created, they are automatically linked to all selected PersonGroups

Picure: Create a Person form
PersonGroups
Note
As of Version 3.0.0, PersonGroups are primarily used in the context of the ISMS functionality. Integration with other modules is planned for future releases.
PersonGroups allow you to logically group multiple Persons for use in responsibilities, audits, and documentation. These groups can represent departments, teams, or role-based clusters of individuals.
To access PersonGroups, navigate to Framework -> PersonGroups. This section provides a tabular overview of all existing groups, along with options to Add, Edit, or Delete entries.
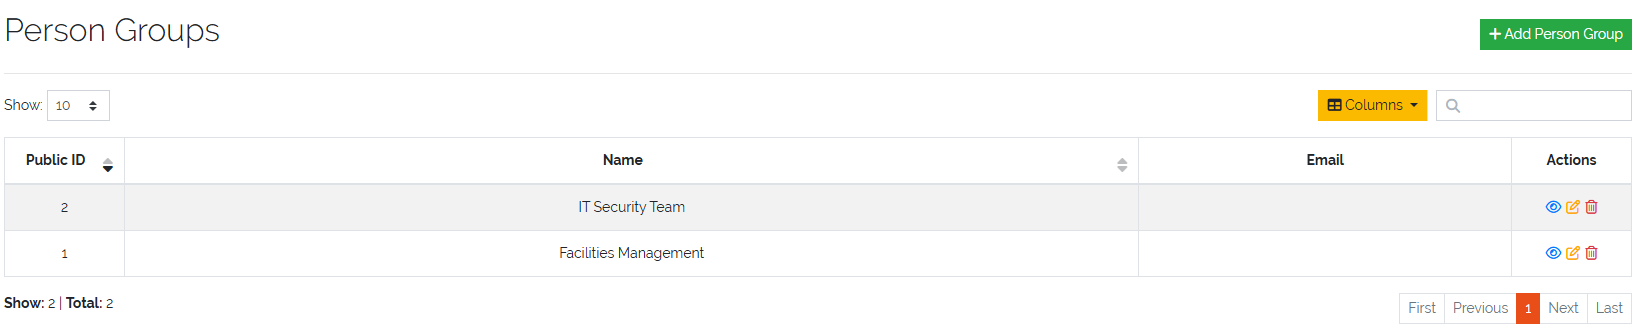
Picture: PersonGroups overview table
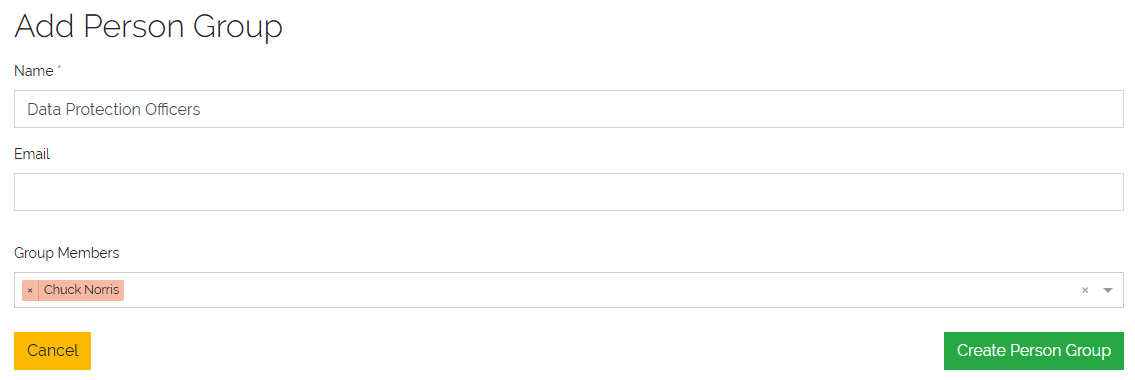
Adding a PersonGroup
To create a new PersonGroup, go to Framework -> PersonGroups and click the “Add PersonGroup” button to open the creation form.
Group Name |
The name of the PersonGroup |
|---|---|
A shared or representative email address for the group (optional) |
|
Group Members |
A list of Persons who are part of this group |
Note
When a PersonGroup is created or modified, its members are automatically synchronized with the corresponding Persons, ensuring that group assignments remain consistent across the system.
Picture: Create a PersonGroup form